When you hear the word “neon,” your mind probably goes straight to signage. Perhaps you envision the busy streets of Broadway, Paris, or the Vegas Strip. However, the creator of neon lights intended the bulbs for illuminating spaces. That’s right. Originally, bright lights weren’t just a fun way of elevating messages in advertising. So, the neon light effect you can apply to photos is more authentic than you might think. After all, this filter applies bright borders to everything in your photos, not just letters.
Even though neon lighting’s original purpose wasn’t for letters, that doesn’t mean that bright signs aren’t a great use of technology. Everyone loves a neon sign. Designers of contemporary spaces – even given the wealth of modern lighting options – still opt for the retro, fun look of neon. Salons and restaurants, for example, often have catchphrases written on their walls in this laidback but eyecatching lettering style.
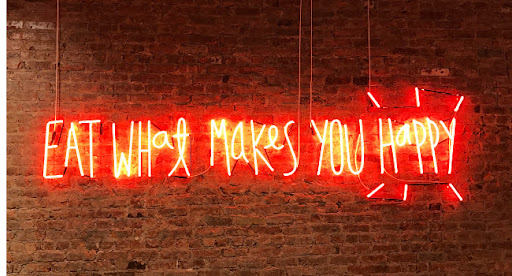
Photo by Jon Tyson via Unsplash
One thing is true: Neon is endlessly recognizable in lettering or a generalized illumination effect and gives off an energetic vibe. There’s no other type of light quite like it. It’s bright, colorful, and curves gracefully around glass tubes. In the following tutorial, we’ll show you how to apply the neon light text effect to an entire photo and add neon lettering fonts and stickers to amp up the energy of your image.
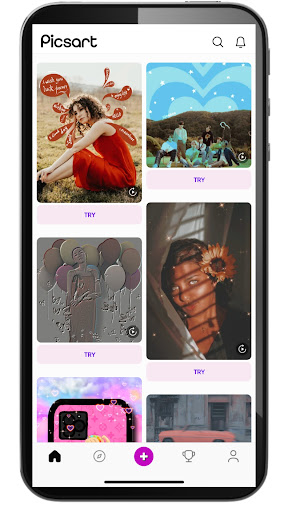
- Open the Picsart mobile application and click on the purple plus sign on the bottom of the screen to start a new project. Your photo library will appear. Choose the image to which you’d like to apply the neon effect.
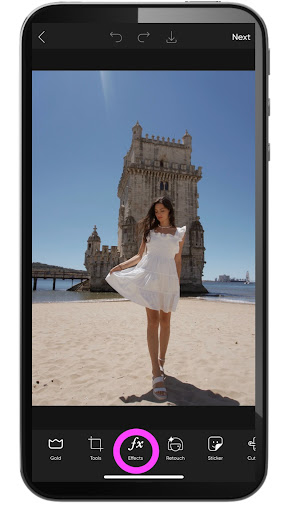
2. On the editing screen, choose “FX” from the menu under your canvas to head to our filters library.
3. Select the “Artistic” filter category from the options at the bottom of the screen. Doing so will narrow down the many filters available. Now, you should be able to locate the “Neon” filter within this category quickly. Tap on the effect to apply it to your photo.
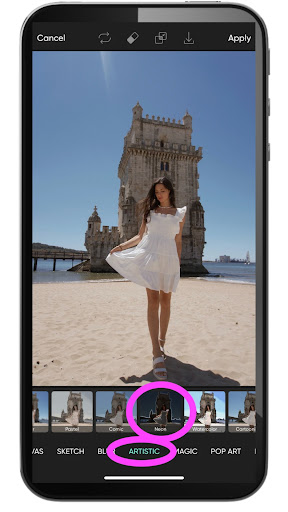
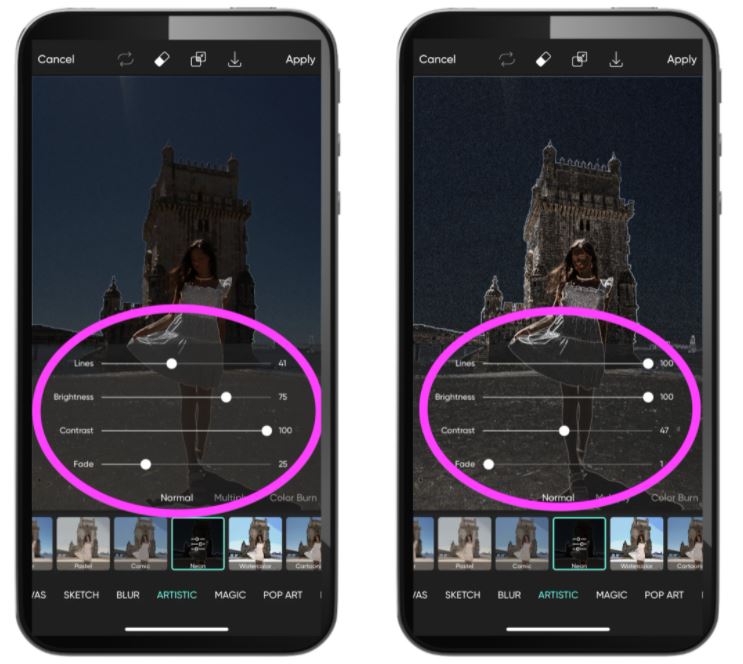
4. Now, it’s time to tweak the effect. Click on the filter again to bring up the adjustment sliders: “Lines,” “Brightness,” “Contrast,” and “Fade.” At this point, you’ll have to use your creative instincts to decide what looks right for your photo. On ours, we slid up the “Lines” effect to increase the intensity of the neon outline, and then we also adjusted the “Brightness” and “Contrast” sliders. We took the contrast of the image down a bit but upped the brightness to bring out essential features of the photo.
5. This step is optional but recommended, as it will help certain parts of your photo stand out. Essentially, we will remove the effect from specific regions of the image. Click on the eraser at the top of your screen to start.
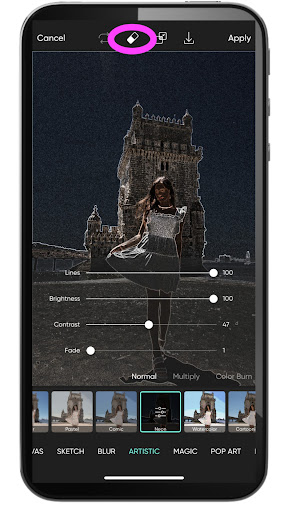
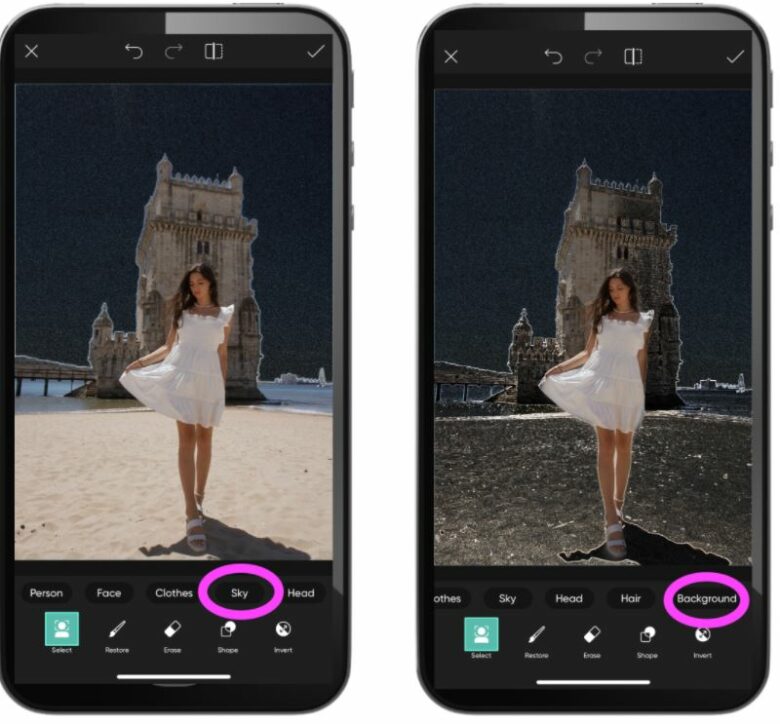
The eraser tool will remove the neon effect in the parts of the photo you select. Once you start using this function, a toolbar will appear at the bottom of your screen. If you wish to keep the effect in an easily-delineated part of your photo – let’s say, to leave just a neon sign background – you can use our simple erasure tools like: “Person,” “Sky,” and so on. We first chose to leave the effect only on the sky, as you can see in the first image below. Then, we switched the selection to include the entire background, as you can see in the second image. These tools are accurate when outlining certain portions of your photo, but if they don’t meet your needs, you can always erase them manually, too. Simply highlight the eraser tool in the toolbar at the bottom of the screen and use your finger to draw over the parts of your photo from which you wish to remove the effect.
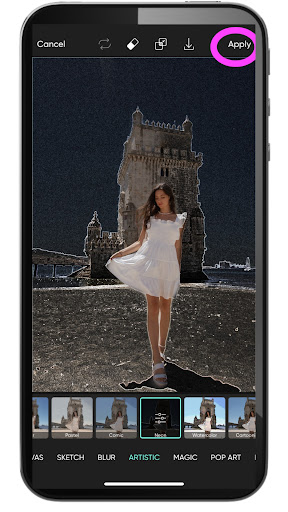
6. If you’re pleased with your changes, click “Apply” in the upper right-hand corner of the screen to save them and move on to the next step.
7. Now let’s look at how to make a neon sign in your photo. It’s as simple as adding some bright lettering using one of our special effects fonts. From the menu at the bottom of your screen, choose “Text,” and a caption box will appear on the screen.

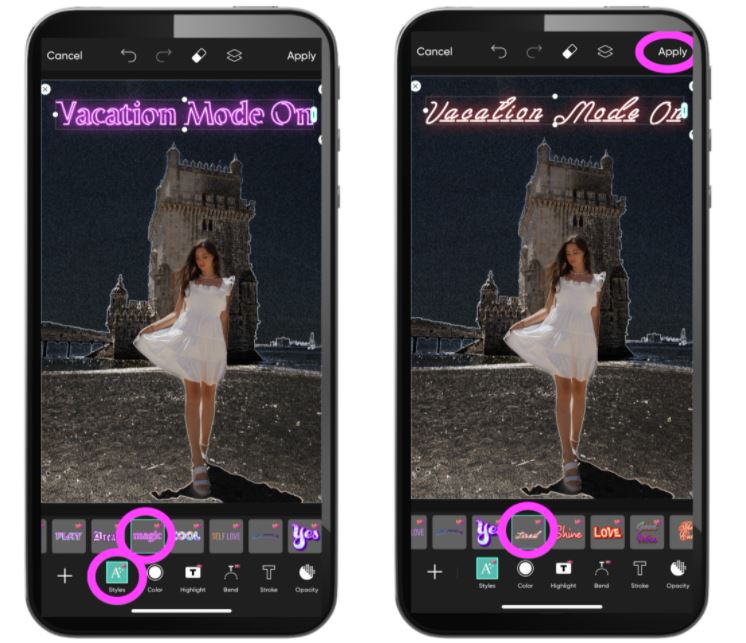
8. Type out the perfect caption for your photo, and don’t worry about the font yet. You’ll be able to change it once you’ve finished writing. To switch your font to a glowing script or other neon variety, highlight “Styles” at the bottom of the screen and flip through the various options until you find one that pairs well with your image. We recommend starting with “Magic” or “Tired,” which are styles that replicate neon signs. Be sure to click “Apply” in the upper right-hand corner of the screen when finished.
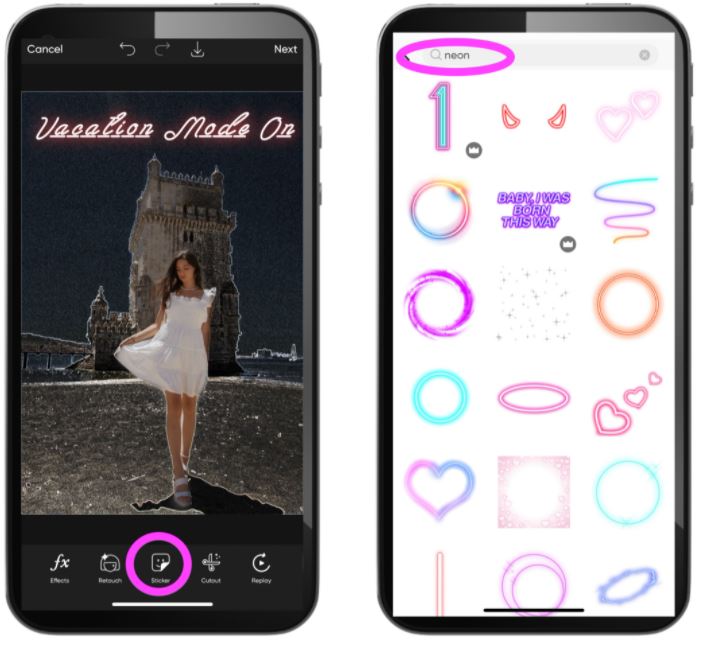
9. Not done yet? We aren’t either. If you want to take your design one step further, you can add some neon stickers and really pull the look together. Select “Sticker” from the menu at the bottom of the screen, which will take you to our vast sticker library. Then, use the keyword “Neon” to search for decals in this style. You can add a sticker to your composition simply by clicking on it. Repeat this process as many times as you wish. There is no limit on how many stickers you can add, so let your creativity guide you.
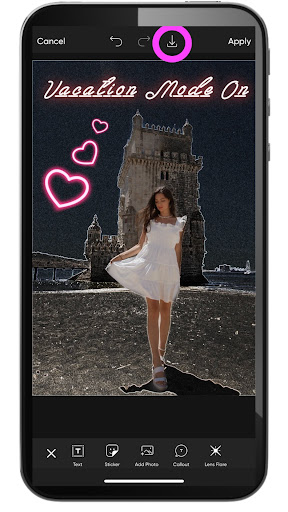
10. When you’re satisfied with your design, export your work by clicking on the downward arrow at the top of the screen. Doing so will save a copy of the image to your phone and give you sharing options, as well. You’ve made a neon image worthy of the buzzing billboards of Paris, Vegas, or New York, so don’t be shy about sharing to your social media accounts and showing your friends how to create a similar effect on their images.
Create at the Speed of Culture
Picsart is a full ecosystem of free-to-use content, powerful tools, and creator inspiration. With a billion downloads and more than 150 million monthly active creators, Picsart is the world’s largest creative platform. Picsart has collaborated with major artists and brands like BLACKPINK, the Jonas Brothers, Lizzo, Sanrio: Hello Kitty, I am a Voter, Bebe Rexha, Maroon 5, One Direction, Warner Bros. Entertainment, iHeartMedia, Condé Nast, and more. Download the app or start editing on web today to enhance your photos and videos with thousands of quick and easy editing tools, trendy filters, fun stickers, and brilliant backgrounds. Unleash your creativity and upgrade to Gold for premium perks!


