There’s a reason that museums frame even the best paintings in the world. For physical art, not only do these borders provide a protective barrier. Frames are also part of the viewer’s experience. Curators specifically choose specific frames for the pieces they protect, and the frame must look good not only on its own but complement the art, too.
Frames can teach us a lot; they’re like a visual history lesson. Certain materials and designs cue us into where and when a frame was made. When museums or private collectors reframe works later in history, experts recommend that they try to maintain the original style and use similar materials. That doesn’t mean, of course, that art owners won’t follow their intuition when framing a piece. As a viewer of art, one is an extension of the creative process. In other words, your experience of an image is essential.
This last point is particularly crucial when thinking about how to frame your own work. If you make physical art, you’re likely experienced at selecting the perfect border for your masterpieces. Now, you can also pair your virtual work with frames. Whether for your creative abstractions or everyday photographs, play museum curator and enhance your pieces with striking frames.
Instead of posting your next social media story right in the moment, take a second and drop the perfect frame on it. The right border adds flair to a birthday post. It can make a silly picture look even funnier. A virtual frame can also complement a photo of a monumental moment in your life, like a wedding or birth, making the experience of sharing big news on social media a touch more special.
You can easily learn how to add a border to your images straight from your iPhone, Android, Mac, or PC, and it only takes a couple of seconds. Unlike with a physical frame, you can swap a virtual one out as many times as you need to get it right.
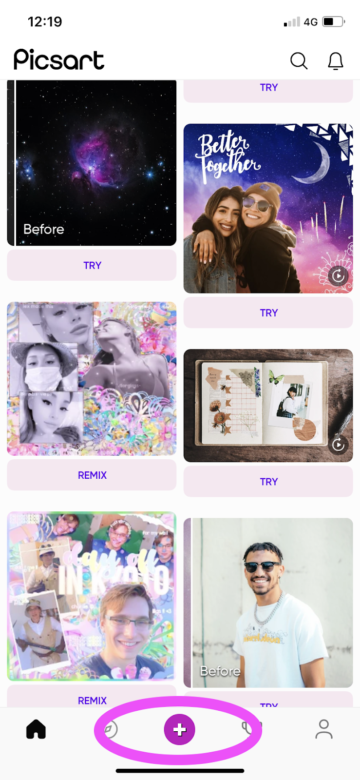
- Open our mobile application and click on the purple plus sign at the bottom of the home screen to start a new project. Your image library will appear. Select the artwork or photo with which you wish to work.
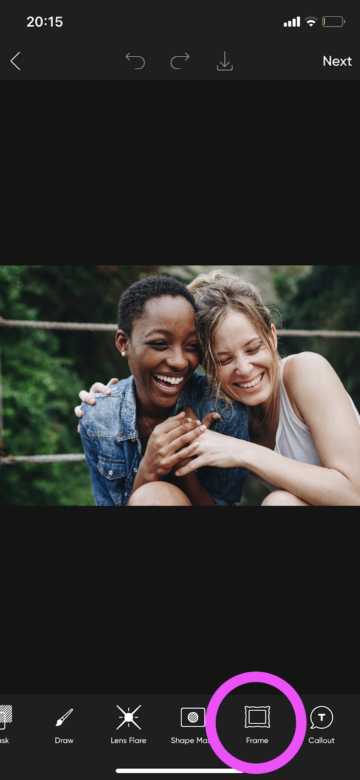
2. On the editing screen, scroll along the menu under your image to find our “Frame” tool and open it.
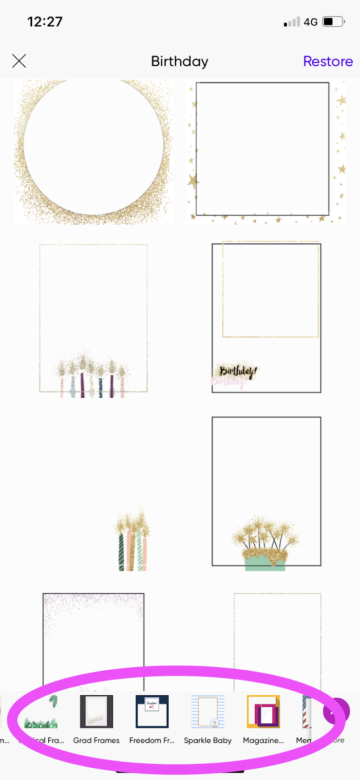
3. Select the perfect frame from our library of options. Keep the original shape of your photo in mind, and choose a border that won’t crop off essential parts of the image. Scroll through the categories at the bottom of the screen to explore different curated categories of frames. When you’ve found the perfect option, simply click on it, and the app will apply it to your photo.
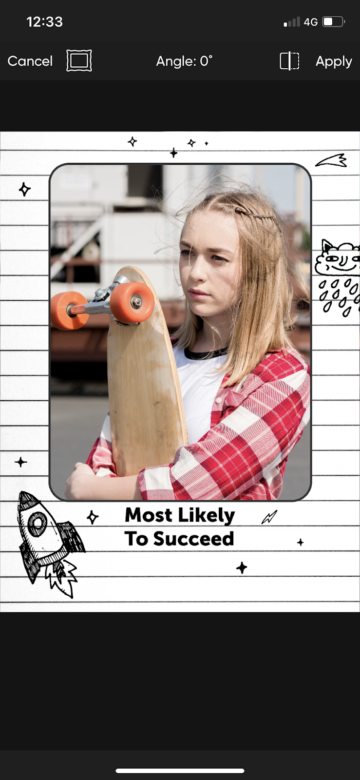
4. Tweak your photo by resizing it with your fingers. You can also tilt the angle of your image by turning it manually. If you want to switch out your border, simply click on the frame-shaped icon at the top of the screen, and if you want to remember how your photo was without the effect, click on the icon that looks like a folded page. When you’ve finished, click “Apply” and jump down to the final steps of this tutorial for information on how to export your image.

5. Our “Frame” tool is also ideal for themed projects. With our categorized library of frames, you can easily find specialized borders for certain holidays and events. Adding this type of border will improve your Instagram stories, family newsletters, and messaging between coworkers and friends. Follow steps 1-4 above, this time picking a themed frame.
6. As the saying goes, “less is more.” If you’re looking for a more minimalist frame for your image, try a different approach. Instead of using a frame, try our “Border” tool, which is also in the menu at the bottom of the screen. This function only adds simple lines around your photo, but you can change their colors and widths to make a subtle, elegant frame that goes well with your image.
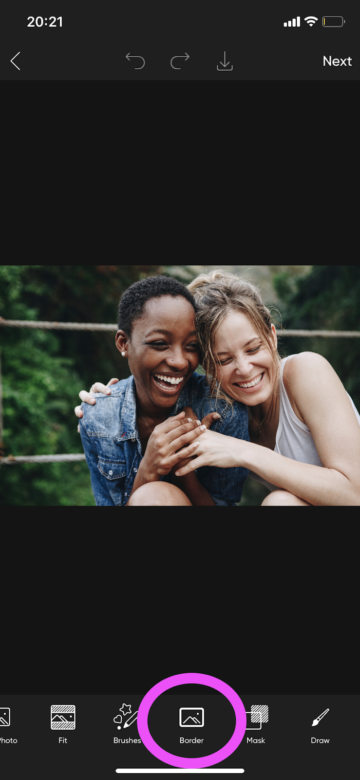
7. The default border won’t look like much; it consists of simple black and white lines. You can change the color of each line by clicking on the swatch next to the “Outer” and “Inner” sliders. Then, select the tone you want from the color pop-up by clicking on one of the preset colors or using the round slider to get exactly the right hue.
Pro-Tip: Stick to neutrals or hues that are already in your image. You can also get a high-contrast effect by using a white border or framing in a hue that complements the content in the picture.
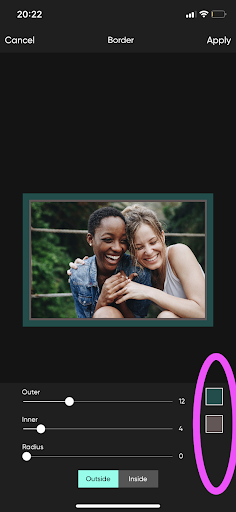

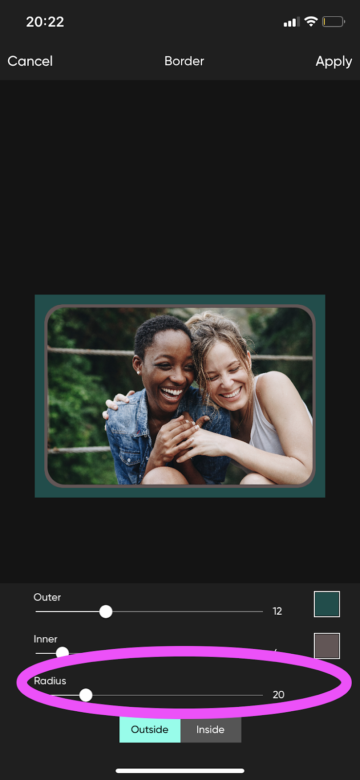
8. Then, use the sliders to change the width and radius of the borders. To change the width of the outer or inner borders, scale up or down the respective sliders. To change the “Radius,” or the curve of the border, move your finger along the slider and watch as the edges of the inner border become more rounded.
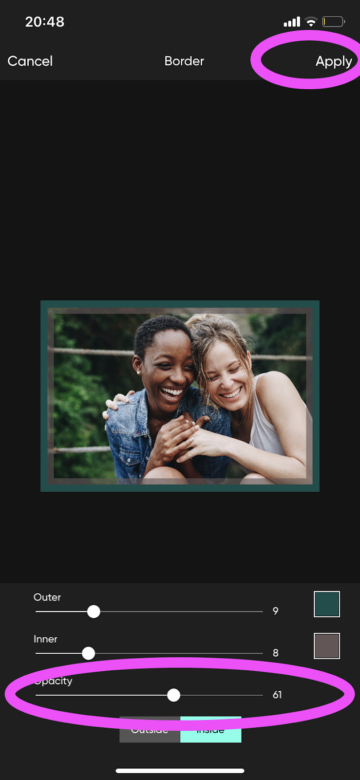
9. Finally, use the “Outside-Inside” toggle on the bottom of the screen to position your frame atop the photo. When “Outside,” the default option, is selected, your border won’t cover up any of the photo, but when you choose “Inside,” the frame will encroach on the edges of the image a bit. Keep in mind, too, that when you select “Inside,” you’ll lose the ability to round out the inner border, but you’ll gain the option to change its opacity. Move along the “Opacity” slider to make the inner border more transparent, allowing more of the photo’s edges to come through. When you’ve finished framing your piece, export your creation by clicking “Apply” in the upper right-hand corner of the screen to lock in your last change.
10. Now you’re ready to export your newly-framed photo for the world to see. Click on “Next” in the upper right-hand corner of the screen, and then, on the final screen, choose whether to save or immediately share your image.
Create at the Speed of Culture
Picsart is a full ecosystem of free-to-use content, powerful tools, and creator inspiration. With a billion downloads and more than 150 million monthly active creators, Picsart isn’t just the world’s largest creative platform; we’re also the fastest growing. Picsart has collaborated with major artists and brands like BLACKPINK, the Jonas Brothers, Lizzo, Sanrio: Hello Kitty, I am a Voter, Bebe Rexha, Maroon 5, One Direction, Warner Bros. Entertainment, iHeartMedia, Condé Nast, and more. Download the app or start editing on web today to enhance your photos and videos with thousands of quick and easy editing tools, trendy filters, fun stickers, and brilliant backgrounds. Unleash your creativity and upgrade to Gold for premium perks!


