
Contents
Sometimes you don’t get the perfect shot, and that’s fine. Editing apps and software allow you to take all the time you need to get your photo just right, whether you want to make major or minor changes. Sometimes, it’s a question of doing a bit of aesthetic retouching, and other times, it’s a more drastic shift. Sometimes you just have to remove people from a photo.
While the individuals in the background of a photo taken at a sporting event or in a busy cityscape give life and context to the image, a person making a funny face behind you in your engagement shot is another story. A stranger intruding on your perfect moment may not be ideal, but this comical trend called “photobombing” is so popular it’s earned an entry in the dictionary. If someone pranks you in this way, fear not. You can erase that stranger from your photo in just a couple of taps.
You can also erase multiple people from photos. Imagine taking a dream vacation to an idyllic beach, only to find out that the setting is way too crowded for you ever to get a photo alone. We’ve all seen those funny side-by-side images that compare expectations with reality. Sometimes, tourist locations are nowhere near as solitary as they look on social media. Perhaps, those travel influencers that appear to have these spaces all to themselves are actually editing out crowds after the fact. You can do the same.
Finally, we’ve all had the experience of taking a photo with our partner or friend in which one person looks great and the other seems caught off-guard. While you can retake the photo until you get it right, perhaps you liked how you came out in the first shot and want to keep it anyway. We’ll show you how to remove someone from a picture and end up with a great portrait of yourself.
Disappearing Act
At one point in time, removing a person from a photo meant either doing a blunt crop job or spending hours on professional editing software dotting a figure away with a digital eraser. In this tutorial, we’ll demonstrate how to edit someone out of a picture by simply copying pieces of a photo’s background into the foreground, covering up the person you want to remove. The results are convincing, especially once you get the hang of using the tools designed for this type of editing. Be patient, and get friendly with the undo button. In minutes, you’ll be a pro.
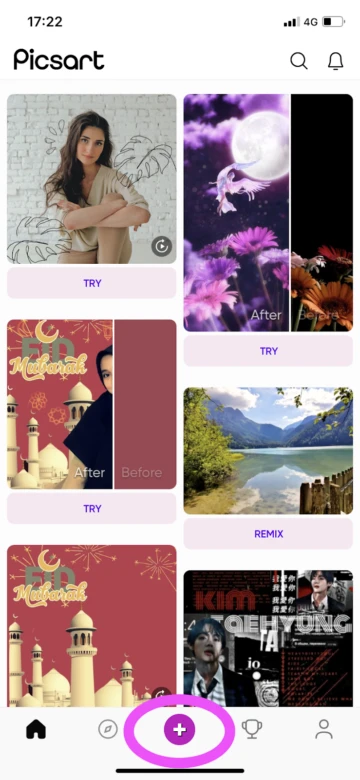
- Open the Picsart mobile app and click on the purple plus sign at the bottom of the screen to start a new design. Your photo library will appear. Choose the photo you wish to edit.
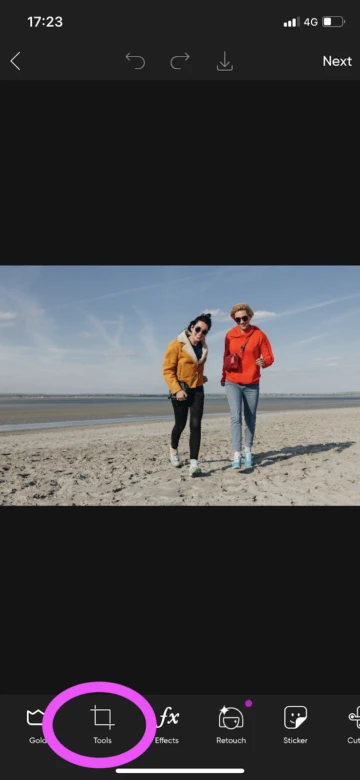
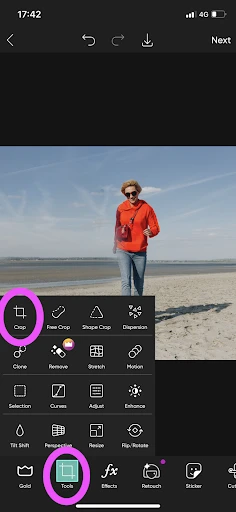
2. Select “Tools” from the menu at the bottom of the screen.
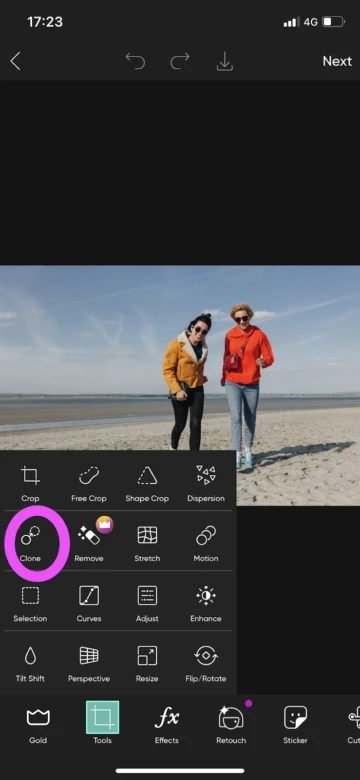
3. From the pop-up menu, select the “Clone” tool.
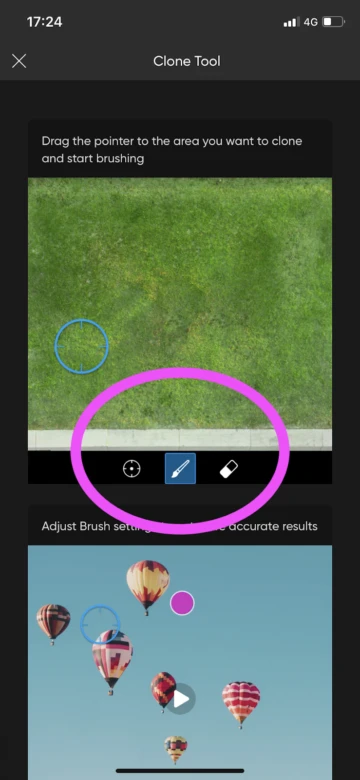
4. Now, spend a couple of seconds preparing yourself for success by getting familiar with the tools you’re about to use. If it’s your first time using the cloning function, a tutorial will pop up with some helpful tips, all of which we explain here as well. The tutorial shows the three tools you’ll use: the pointer, the brush, and the eraser. The pointer copies whatever part of the photo it is focused on. The brush transports that copied material to other parts of the photo. The eraser is essentially an advanced undo button; you can swipe the eraser over recent changes to make them disappear. You can, incidentally, do the same with the actual undo button at the top of the screen; we’ll leave this up to you. Finally, the tutorial gives some great advice: “Adjust Brush settings for more accurate results.” You can change the settings of all three tools, and we’ll explore how in the next step.
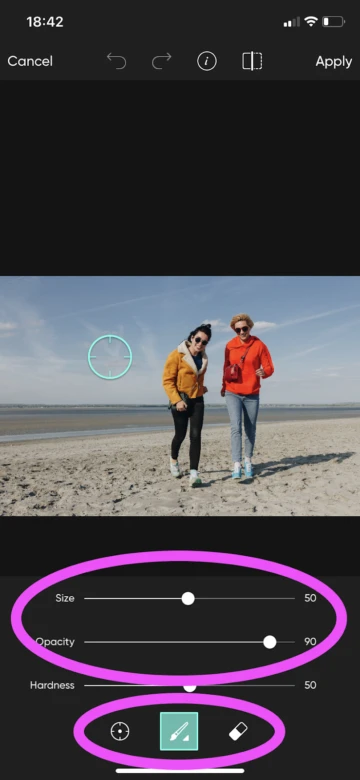
5. To change your tool settings, click on on the white arrow in the corner of the icon for each. Start with the pointer tool. Depending on how precise you want your work to be (and how much time you wish to spend), you can increase or decrease the size of the pointer. If you want more precision, opt for a smaller size. Then, jump over to the settings for the brush tool. Make sure that the size setting for the brush is the same as that of the pointer. These two tools work in tandem. The pointer grabs parts of the picture, and the brush simultaneously takes those parts and places them elsewhere. As the brush moves, the pointer moves, literally in parallel motion. The last setting you’ll want to check now is that of brush “Opacity.” If the intention is to remove someone entirely from a photo, set the opacity to 100. This will ensure complete coverage.
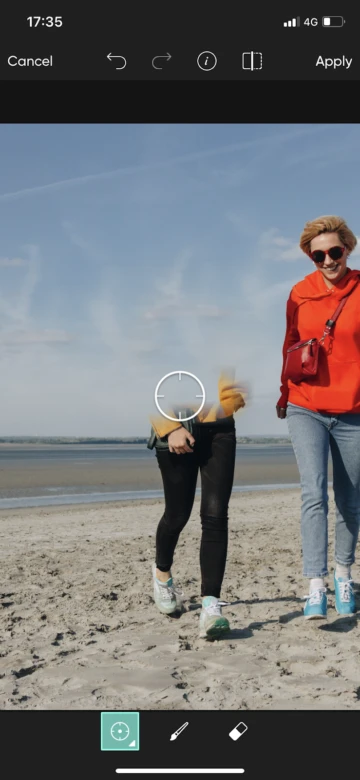
This step is bound to take a few tries, but practice makes perfect. Select the pointer tool from the menu below the photo and place it on the background. Essentially, you will be superimposing this portion of the background onto the person you wish to remove. The idea is to situate the pointer in the vicinity of that person but not too close either. Remember that the pointer copies everything it touches, including people and objects. Also, recall that the pointer moves with the brush as you work. So, if while you’re working on brushing away a person, the pointer accidentally comes into contact with that person, the pointer will start to pick up that material too. Think of the pointer as paint for the brush. If you want to paint over a person with the background colors, you have to be careful not to dip your brush in any other “paint” but that of the background. To practice, set the pointer tool on the background, and then release your finger from the screen. Put your finger back down on the person you want to remove, and brush from side to side. Watch how the pointer moves with you, copying the background colors onto the person you’re brushing away.
Pro Tip: Work in stages. You don’t have to get the removal right in one smooth brush stroke. In fact, doing so is nearly impossible. When you get a section right, release the brush, place a new pointer on the background, and resume work.
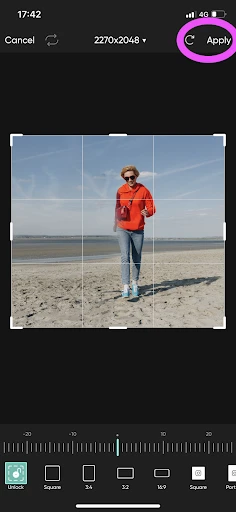
6. Once you’ve removed the person from your photo, you can jump down to the next step of this tutorial to learn how to export or share your image. Alternatively, you can do some final edits on your photo, including a clean crop. By erasing one of the figures in your composition, you have more empty space. You can crop your photo down by selecting “Tools” from the menu at the bottom of the screen and then tapping “Crop.” Draw a frame out around the portion of the image you wish to keep, and then click “Apply” in the upper right-hand corner of the screen.
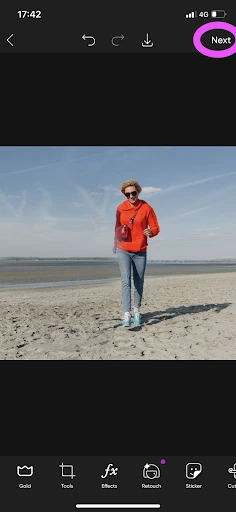
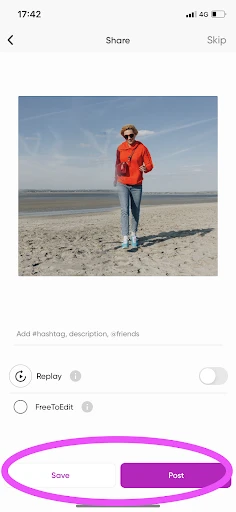
7. Finish up by clicking “Next” in the upper right-hand corner of the screen and then choosing whether to save or share your expertly edited piece.
Create at the Speed of Culture
Picsart is a photo and video editing platform and creative community. A top 20 most downloaded app worldwide with over 150 million monthly active users, its AI-powered tools enable creators of all levels to design, edit, draw, and share content anywhere. The platform has amassed one of the largest open-source content collections in the world, including photos, stickers, backgrounds, templates, and more. Used by consumers, marketers, content creators and businesses, Picsart tools fulfill both personal and professional design needs. Picsart has collaborated with major artists and brands like BLACKPINK, Taylor Swift, Lizzo, Ariana Grande, Warner Bros. Entertainment, iHeartMedia, Condé Nast, and more. Download the app or start editing on web today, and upgrade to Gold for premium perks!


