In art, blending in isn’t always a good thing. On the contrary, what many creators want most is to stand out. In this article, however, we won’t be talking about figurative blending. We’ll be exploring the literal kind: how to blend two pictures together into perfect, seamless harmony.
Why blend two photos together?
Simply put, merging parts of different photos together results in an utterly unique image. This photo editing technique looks particularly striking in abstract or surreal images because layering photos brings a fantastical aspect to regular shots. You can add unique or otherworldly elements to an everyday photo to make it look avant-garde or like a polished piece of contemporary art. If you’re in a band, for example, this technique might help you make an edgy album cover. This photo effect is also perfect for making funky posters, book covers, or social media posts.
Blending two pictures together doesn’t necessarily have to result in surreal art. You can also use the technique to create trendy double exposure effects. Use it to layer natural-looking images onto one another for an imperceptibly smooth effect that’s seemingly realistic.
In the tutorial below, we’ll not only show you how to blend background images with creative foreground elements, but we’ll also explore how to merge objects on everyday design projects.
How to combine images together
To get started, you’ll need an idea and two or more photos. Think about the image that will be in the background of your project. Perhaps it is a portrait or a landscape onto which you wish to impose another image for added effect. Think about what that second image might contain. Are you going intergalactic with your project? If so, perhaps your second layer might include a peak at the stars as our first example does below.
Maybe you’d like to “change the weather” by layering in some clouds or a rainbow, as we show in our second example below. Whatever you decide, keep in mind that you can layer as many images together as you see fit. The basic process won’t change. So, without further ado, let’s jump into this tutorial on how to blend two pictures together.
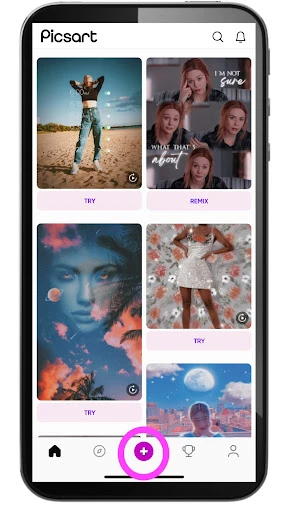
- Open the Picsart app and click on the purple plus sign (+) at the bottom of the screen to start a new project. Select a photo from your photo library or use one of the free to edit images from the Picsart library. This image will be the base or background photo (you’ll place another image on top of this one).
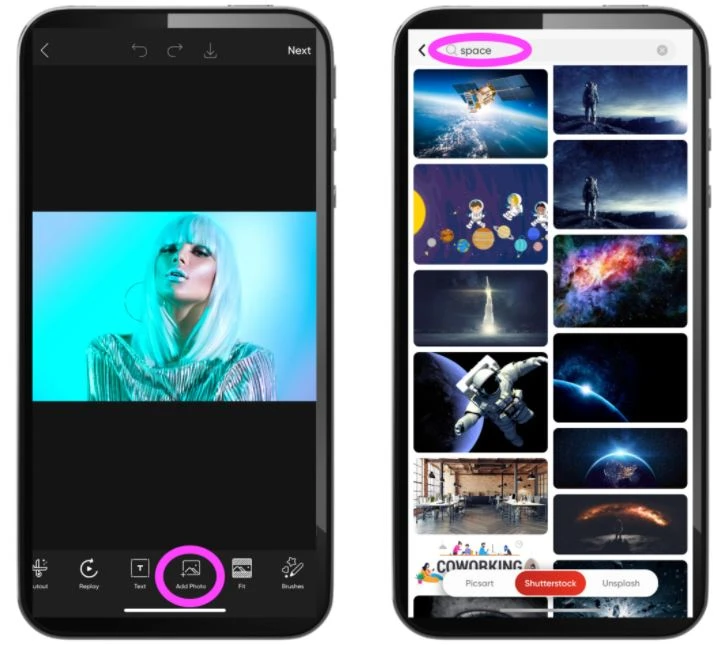
2. Scroll across the Editor toolbar and tap on the Add Photo icon on the toolbar below your canvas. Now, choose the photo you wish to use as an overlay (this will be the top image) from your photo library. Or, you can search our free stock photos for the perfect fit. We searched for “Space” to bring up this galactic image.
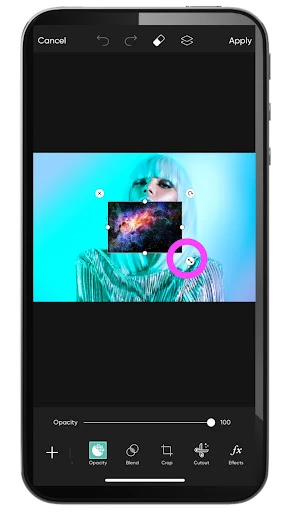
3. With the top overlay image now on your editing screen, drag on the photo’s corners to stretch it to cover as much of the image below it as you’d like. Don’t worry if the top photo covers up the one below it completely. In the following steps, you will be able to blend the photos together. You can also rotate the image as needed by pulling it in a circular motion with your finger.
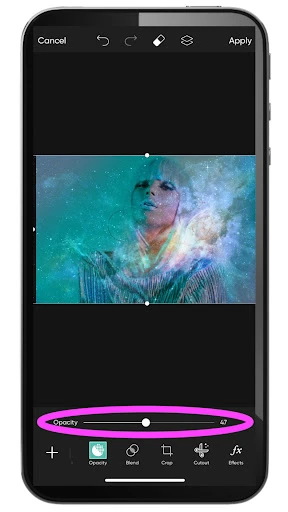
4. Once you correctly position your overlay photo, it’s time to blend images together. Adjust the opacity slider below the image to get the foreground photo to fade into the one behind it. The lower you go on the slider, the less you’ll see of the top layer. In most cases, you’ll want to aim for somewhere in the middle of the slider, around 50. That will ensure that one photo doesn’t overpower the other.
5. If you’re pleased with the look you’ve achieved, you can skip this step or simply play around a bit with the blending filters we’re about to describe. Remember, you can always remove a filter if you don’t like the effect.
Tap on Blend on the bottom of the screen and click through the different filters to see if one intensifies your image overlay effect in a visually pleasing way. If you don’t want to use a blend filter, simply move back to the Normal filter to remove the effect. Whatever you decide, be sure to click Apply in the upper right-hand corner of the screen to save your changes.
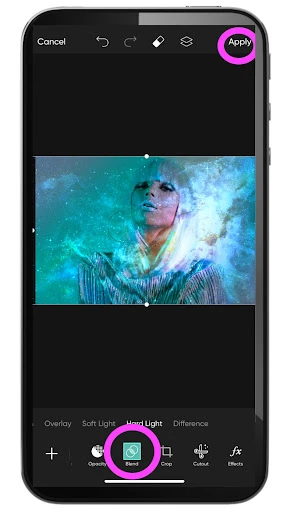
6. Repeat the overlay process as many times as need be. When you’re satisfied with your blended image, add text, stickers, filters, or other elements to finish out your project.
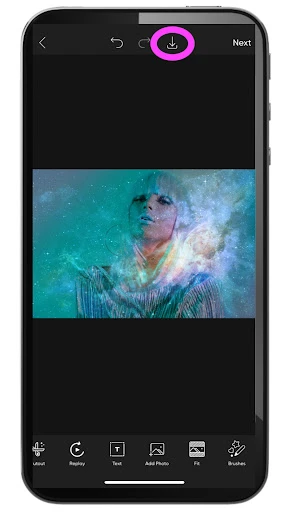
If you’re making a poster or album cover, now’s the time to add your band name or other text details. Explore the toolbar at the bottom of the screen for all our editing options, including text boxes and stickers. Then, when you’ve finished editing, click on the downward arrow above the image to download it directly to your phone. Or, tap Next to save and share this unique project with the Picsart community.
A less abstract look: another way to use image overlays
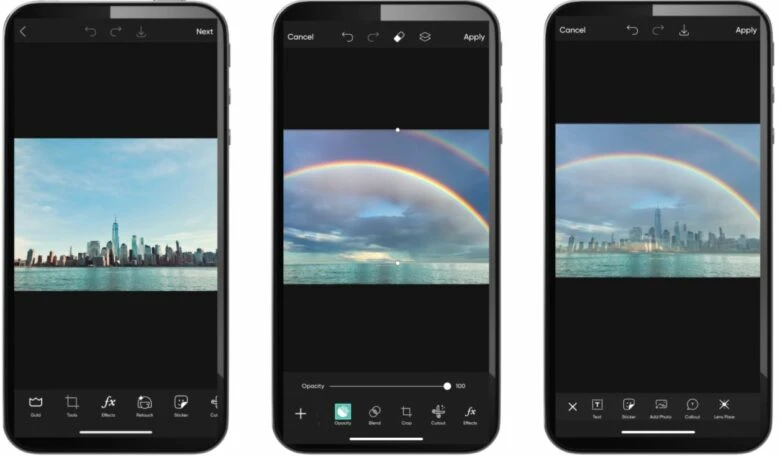
Perhaps you’re looking to blend two pictures together to get a more realistic-looking photo effect. Following the same steps as above, we changed the feel of a cityscape by tinkering with the weather. We started with an image of the New York City skyline and layered in a stock photo of a double rainbow. We took down the blend opacity and positioned the overlay so that it only affected the sky of the photo. The result is pretty convincing.
Create at the Speed of Culture
Picsart is a photo and video editing platform and creative community. A top 20 most downloaded app worldwide with over 150 million monthly active users, its AI-powered tools enable creators of all levels to design, edit, draw, and share content anywhere. The platform has amassed one of the largest open-source content collections in the world, including photos, stickers, backgrounds, templates, and more. Used by consumers, marketers, content creators and businesses, Picsart tools fulfill both personal and professional design needs. Picsart has collaborated with major artists and brands like BLACKPINK, Taylor Swift, Lizzo, Ariana Grande, Warner Bros. Entertainment, iHeartMedia, Condé Nast, and more. Download the app or start editing on web today, and upgrade to Gold for premium perks!


