So, you’ve created a piece of shareable content and now you’re wondering how to make a watermark to put your personal stamp on your photos or videos. As a content creator, your ultimate goal is to share your creative vision with the world—or, at the very least, your core audience. When you spend valuable time and resources creating digital assets, you want to protect your work from getting lost in the endless sea of original work online or, worse, stolen and shared without your knowledge or consent.
A watermark is great because it puts your distinctive signature on your creative product. It’s also one of the fastest and easiest ways to communicate your personal or professional brand to the viewer in an instant. Your watermark can be your brand logo, an adaptation of your brand logo for a complementary mark, or completely original. Your watermark can also be your brand’s website URL. There are endless options, so it’s really up to you how you want to set your content apart.
Why are Watermarks Important?
Learning how to make a watermark is an essential skill for all content creators to establish a business or brand’s visual identity and protect your intellectual property. While we still all have a little bit of “paperwork” in our lives, there’s no denying we’ve gone digital as a society. Even our forms of payment are now often virtual. That necessitates a 21st-century watermark solution, one that we can use on all the files we pass around via email, the internet, photo sharing websites, and social media. It can be beneficial to have a watermark handy if you own a company that works with confidential or proprietary material.

General Rules for Watermarks
Your watermark should never distract the viewer from the photo or video or interfere with the main image in any way. In fact, many designers and photographers choose to colorize their watermark with a complementary shade from the main image. That way, the watermark almost looks as if it is a part of the main image. If the watermark is the first thing the viewer sees, it’s probably too big, too prominent, or too decorative. Keep your watermark simple to let your content shine!
Where Should I Put My Watermark?
Your watermark should maintain a minimum distance — known as clear space — from other content. No matter where you put it, be sure to keep it consistent. If you like the way it looks on the bottom right corner of your photos, make sure it appears in the same spot on all of your content to give your content a recognizable look.

What Size Should My Watermark Be?
Strike the perfect balance by considering proportions when sizing your watermark. Remember, your watermark should not be the first thing the viewer sees. Play around with the dimensions of your watermark until you land on the perfect size.

How to Make a Transparent Watermark
This tutorial will show you how to make a watermark logo and apply it to an image or document. Then, no matter where you send or post your files or pictures, viewers will know that you are the creator of them and wish to protect the material against copyright infringement and misuse.
- Open the Picsart app and click on the purple plus sign at the bottom of the screen to start a new project.

2. If you already have a logo or copyright watermark you’d like to use and you wish to add it to an image, you can skip down to Step 8 to learn how to insert the graphic and change its opacity. However, if you wish to make a watermark from scratch, continue reading.
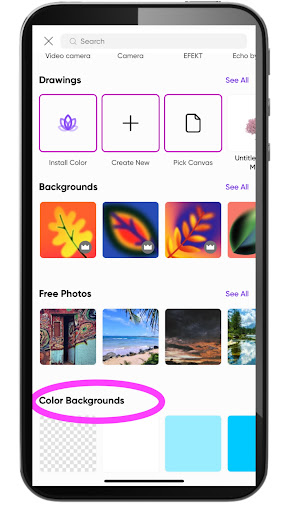
3. Scroll down to the “Color Backgrounds” projects category and choose the gray checkered design. This background is, in reality, transparent, meaning that you can later export the watermark you create in the following steps without any backing, and it will be easy to import into other documents and images in the future.
4. From the menu at the bottom of the screen, select “Text” to add words to your blank canvas.

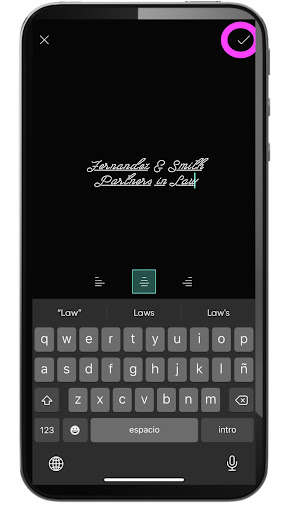
5. Write out the name of your company. Don’t worry about the font or color just yet. You will be able to change this in the next step. When you’ve finished writing, click on the check mark in the upper right-hand corner of the screen.
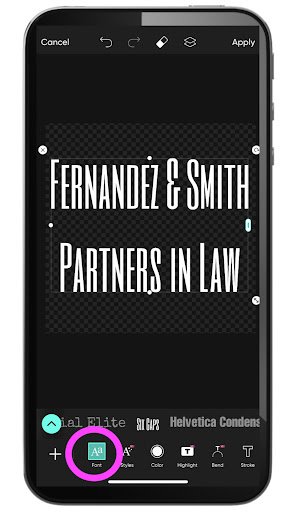
6. Now, with the “Font” icon highlighted, you can choose from the many available lettering styles. Simply scroll through them and click on the one you like to apply it to your text.
7. You can now change the hue of your text. Highlight the “Color” icon. Then, select from one of our ready-made tones or mix up your own by clicking on the color wheel. Use your finger to select exactly the right hue on the wheel, and then click the check mark in the upper right-hand corner of the pop-up to apply said hue to your text. Don’t panic if you choose a lettering color that doesn’t show up well on the background. Remember that the backing is transparent, so this won’t matter down the line.

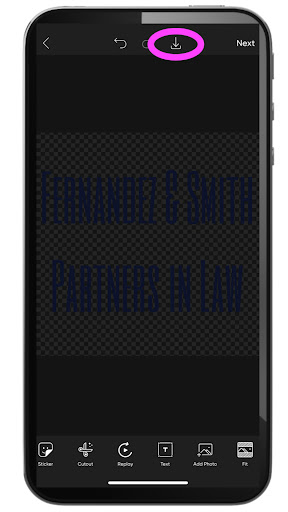
8. Download your watermark by clicking on the downward arrow above your canvas. Doing so will save the image on your phone on a transparent background that is easy to import into other images and documents as an overlay that won’t obscure the content behind it.
9. Whether you’ve just learned how to make a watermark for photos or already had one ready, this step is essential because it allows you to add the graphic to another image. To get started, repeat step 1, but this time, search your personal photo library for the image to which you wish to add a watermark. With the background image on the editing screen, scroll along the menu under your canvas and click “Add Photo.”

10. Now, find the watermark image you’d like to use – perhaps the one you just made by following steps 1-7 – and click on it to insert it on top of the background image. Now, you can resize and use your watermark in different ways, as shown in the following steps.
11. One option is to place your watermark in the corner of your photos so that viewers know you own or created it. Be it an image for your business or a stunning wedding or landscape shot that you took, this is a simple and eye-catching way to put your name or brand on it.

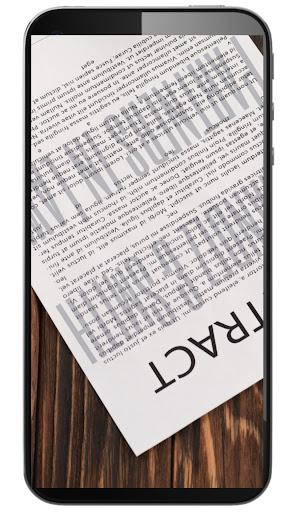
12. Alternatively, you can reduce the opacity on your watermark and stretch it out using the resizing pulls at the image’s corners. Decreasing the opacity will make your watermark look transparent, as if it were integral to your virtual paper, kind of like the security features found on physical currency or letterhead. Once you’ve finished applying your watermark, you can download your image by clicking on the downward arrow above your canvas.
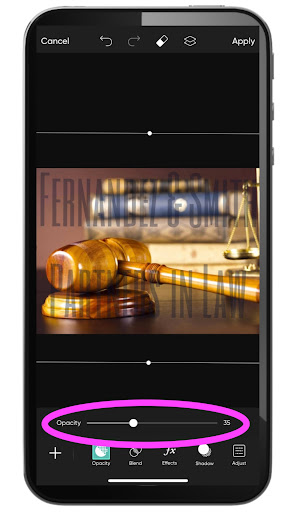
13. Finally, keep your clear-backed watermark on hand so that you can insert it in other images down the road. You can even try importing it into other programs to add it to important or proprietary texts. Just be sure to familiarize yourself first with copyright, trademark, and other registration laws and your rights under them.
How to Make a Video Watermark for YouTube
Making a YouTube watermark or a watermark for your original video is as simple as making a watermark for a photo!
1. Upload Your Video
Upload your video file and your original watermark to your device’s photo library. Once you’re ready to start editing, add your video file to the PicsArt app by selecting the video from the video library and tapping on the Add icon at the bottom of your screen.
2. Add Your Watermark
Click on the Add Photo icon in the editor panel at the bottom of your screen. You will be taken back to your photo library to find your watermark image in your saved photos. Select the image you want to use as your watermark and click on the Add button at the top right of your screen. Your watermark image will ¥now be layered on top of your original video. Position, modify, and adjust your watermark’s opacity as you wish. You may also add a text watermark to your video by using PicsArt’s Text Editor feature.
3. Apply Changes
Click Apply at the top right of your screen to ensure your changes are made to your video. You may still modify your video at this point, but be sure to apply your changes with each step to incorporate your modifications.
4. Save and Share
Click on the arrow at the top right of your screen to save and share your video.
Create at the Speed of Culture
Picsart is a full ecosystem of free-to-use content, powerful tools, and creator inspiration. With a billion downloads and more than 150 million monthly active creators, Picsart is the world’s largest creative platform. Picsart has collaborated with major artists and brands like BLACKPINK, Taylor Swift, the Jonas Brothers, Lizzo, Ariana Grande, Jennifer Lopez, One Direction, Sanrio: Hello Kitty, Warner Bros. Entertainment, iHeartMedia, Condé Nast, and more. Download the app or start editing on web today to enhance your photos and videos with thousands of quick and easy editing tools, trendy filters, fun stickers, and brilliant backgrounds. Unleash your creativity and upgrade to Gold for premium perks!


